Sticky Post

We are currently not maintaining our blog here. Please go to our Facebook Page for latest updates!

Wednesday, May 30, 2012

Preparations for Transit of Venus Part 2 - Projecting the Sun

In our previous post, I highlighted some of the various solar filters we'll be using for safe direct viewing of the transit next Wednesday.
Here's some of our latest attempts at viewing the Sun using other techniques, which can also be used for the upcoming Transit of Venus.

Projection
This involves projecting or reflecting the Sun's image on to a screen so that it can be viewed indirectly.
It can be achieved in various ways, the simplest of which is probably "pinhole projection":

Take a large piece of card, poke a hole in it with a pencil or skewer (try placing some bluetack underneath as a base so that you don't poke your finger). Hold the card with the hole, in front of another piece of card, hold them up in line with the Sun so that a small image of the Sun can be seen on the rear card.
Remember the idea is to look back at the rear card. NEVER LOOK DIRECTLY AT THE SUN THROUGH THE HOLE.


In order to show that this is really an image of the Sun and not simply a image of the round hole, I made another card, this time with three holes each of different shape. When held about arm's length apart to focus the light, each hole produces a round image of the Sun.


Another method is "telescope projection", whereby you hold or mount a screen/card behind a telescope, which is pointing at the Sun.
Looking at the telescope's shadow helps you adjust the position of the telescope to safely find and focus the Sun's image. Once again never look directly through the telescope, as the intense sunlight will cause permanent eye damage.

We also tried "binocular projection"(see pictures below), which is similar to what I just described for the telescope projection above, except that you end up with two images from the pair of lens. Experimenting with the distance of the card/screen and the focus will alter the size and brightness of the image.
Building another cover or screen around the binoculars/telescope will help provide extra shadow in order to enhance the Sun's image.


If I had the time I would have made a more sturdy support or base to mount the screen to the tripod so that I wouldn't have to keep holding it or balancing it on my head.
A good example of such a mount can be found here in this video I found on YouTube:

Friday, May 25, 2012

Speed of Light Experiment


In between workshops, shows and other events, we find time to explore ideas for new programmes. This week, over lunch, scobbers Yong, Kin Guan and myself had a number of discussions about how to demonstrate the nature of waves, light polarisation, the doppler effect and the speed of light, the kind of things that we science educators get very excited about, well some more than others. It was even more exciting when we remembered a popular demonstration that uses a microwave oven to measure the speed of light. So, coming back to the office after lunch we decided to try it out.

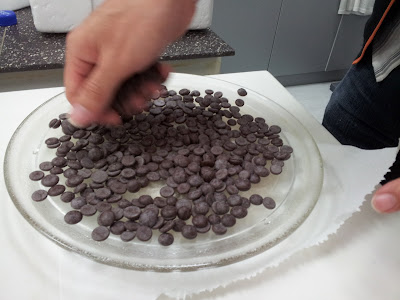
First we needed to find something that can easily melt so we quickly procured some chocolate chips from........... somewhere. Next we headed for the microwave in the 3rd floor lab staffroom.
Having removed our lab attendant's lunch from the microwave, Yong gave the glass plate a wash and covered with the chocolate chips.

The next step was to remove the plate's base from inside the microwave so that the plate cannot spin.

This is the important part as the turning motion of the plate helps spread the microwaves around whatever it is you're cooking to allow for even heating. However, for this experiment we do not want an even distribution of heat, we need to identify where the hot spots of the microwaves are, so no rotation.

We also used some handy bottle caps to raise the plate above to central hole and to keep it level.

After the all important set up, it was time for action. Our non-rotating plate of chocolate chips was placed in the microwave and heated at FULL POWER for about 20 seconds.
And voila! It worked.


As you can see from the pictures above, there were six separate partially melted areas (i.e. the shiny bits). These areas, arranged in neat parallel rows, are the so called hot spots, receiving more heat than other areas. The reason for this is due to the fact that microwaves behave like.......waves, meaning that they form peaks (crests) and troughs, which are the regions where the intensity is at its greatest.


Microwaves are just one form of electromagnetic radiation, similar to light. However, microwaves are long enough for us to be able to measure them using a ruler.
Measuring the distance between two of the melted areas gives you the distance between one peak and one trough, which corresponds to half a wavelength.


In our experiment, this distance was about 0.065 metres (or 65mm). Multiplying this number by 2, we got a wavelength of 0.13 metres.
Wavelength x frequency = speed (velocity)
The frequency is usually printed on the back of the microwave. Our microwave's frequency was 2450 MHz (2450,000,000 Hertz).
Therefore 0.13 x  2450000000 = 318,500,000 metres per second.


We measured the distance between another pair of melted areas and got a second wavelength measurement of 0.12 metres. This gives a speed of 294,000,000 metres per second.
Taking the average between these two speeds, we measured the speed of light to be 306,250,000 metres per second.
The actual speed of light is approximately 300,000,000 metres per second.

Therefore, we declared this experiment a success! Our crude attempt at measuring the speed light turned out to be realtively close to the actual value, we were only out by about 6,000,000 metres per second (hmm, maybe it sounds better if I say by 2%).
There are many examples of this experiment on YouTube as well as other places. It can also be tried using, large bars of chocolates, cheese or marshmellows, although heating times may vary :)


Simple science in a kitchen, and the best part is that you can eat your experiment after you're done.

Monday, May 21, 2012

New Toys

Recently, I've been on the lookout for new models and props related to astronomy that can be used in some of our school programmes, like are planetarium shows and large group demonstrations. During a search on the internet I came across a large scale inflatable solar system.
At first it looked like it was only available on overseas websites like Amazon but later I found a local supplier here in Singapore, The Learning Store/Expenovate.

The next day I went down there to take look, and bought the last two sets of their current stock. I intend to use one set for  some interactive play during the introduction to our planetarium programme for preschoolers. Currently I'm using a series of Styrofoam balls and marbles to illustrate the location and size of the planets in the solar system, the inflatable planets however are much more visually appealing and you can bounce them around.


The second set will be ideal for my upcoming talk on "the planets" for the NLB, which I'll be conducting as apart of their astronomy month at Jurong East Library on Saturday 2nd June.

Back at Science Centre,  the solar systems attracted quite alot of attention from my fellow scobbers and colleagues who were in the office at the time. Kin Guan and myself set about inflating the planets inside our cubicle area using the supplied footpump, which made a loud high pitch sound every time we stepped on it. One of our colleagues found this particularly disturbing, as it is similar to the sound of scratching a blackboard with your fingernails (does anyone still use blackboards?), something known to send shivers down your spine, although I think my colleague used the phrase "makes me resonate" :/

We inflated the rest of the planets in the walkway outside and once finished brought them back into the office where several others contributed other ways of using them, like attempting to spin each planet on one finger.


The inflatable solar system is a nice set for visual demonstrations and explaining the solar system layout, however the sizes are not to scale, although the gas planets (Jupiter, Saturn, Uranus, Neptune) are quite close.
Of course the Sun is so big its hard to represent its true size.  Sometimes I will still use marbles and Styrofoam balls to represent the size of the rocky planets like Earth, Mars, Venus and Mercury, which are incredibly small compared to the gas giants.

I guess its hard to find a really accurate solar system model because of the large variation in size, not to mention the huge distances between the planets.

As often happens when shopping, you sometimes come back with more than you intended to buy. Likewise, whilst at the learning store I also picked up these colourful posters which I thought would be nice to display inside the observatory:


Wednesday, May 16, 2012

Preparations for Transit of Venus - Part 1

In three weeks, an alignment between the Sun, Earth and Venus will result in Venus travelling (transiting) in front of the Sun.
Venus usually travels between the Sun and the Earth (what's called an inferior conjunction) every 1.5 years. However, the conjunction on June 6th (Singapore time) is a near perfect alignment, which only occurs twice in 100 years or so. Therefore, this will be the last transit until Dec 2117.

Currently, Venus is visible in the evening for about 1 hour after sunset (i.e. before 8:30pm). It will gradually get lower in the sky as it get closer to its conjunction with the Sun and the Earth.
Photo of Venus, shining brightly above the Science Centre entrance:

During the Transit itself we can expect to see a small black dot (Venus), making its way from one edge of the Sun to the other.

Here is a diagram illustrating the approximate positions of Venus throughout the transit (as seen from Singapore):
Notice that the transit begins before sunrise in Singapore, therefore we will not be able to see the start of the transit. By the time the Sun is high enough to see, Venus will be about a third of the way across the Sun.

There are a number different ways to view the transit, but the most important thing is NOT TO LOOK AT THE SUN DIRECTLY WITHOUT A PROPER SOLAR FILTER.

This week, we've been trying out some different solar filters that we'll be setting up for visitors during our Transit of Venus event.


We have a number of large solar films that we'll be setting up at specific locations around the observatory.

(Above) Photo of Sun as seen through filter. (It will clearer when using naked eye instead of camera)

We'll also have a number of viewing points with small solar filter glasses.

Using these special filters provides an unmagnified view of the transit, where the Sun will appear about the same size of an average full moon.

Over the coming weeks I will continue to post more about other methods we will be using to provide more magnified views of the transit.

Friday, May 11, 2012

Reflections on a Supermoon

Last weekend there was a so called "supermoon", where this month's Full Moon coincided with the Moon's closest approach (perigee) to the Earth. This made the already large Full Moon, bigger and brighter than normal. This created quite alot of interest, especially with the help of news headlines and social media posts stating clearly, that this would be the biggest and brightest Full Moon of the Year, an event not to be missed!!
I myself also posted an announcement on our Observatory Facebook page. I was momentarily surprised when a similar post on Science Centre main Facebook, gained more than 100 likes in a matter of minutes. Immediately I began to compose another post to include more specific details about the event, only to realise that I was describing this event as relatively inconspicuous, basically saying that "yes it will be bigger, but not THAT much bigger".
Alas, in the end I deleted this information and instead posted some basic facts about the size difference and how to observe the Full Moon. The thought occurred to me that despite all the excitement and hype, this might be one of those times to sit back and let others decide for themselves whether they thought the moon looked bigger or not.
Admittedly, from my experience this particular Full Moon did look marginally larger than average and I have heard many other people also observe a slightly larger and brighter appearance. In reality the difference between the Moon's closest distance (perigee) and furthest distance (apogee) is only very small (around 42000km) compared the average distance of the Moon from Earth (388,000 km).
However, observing the Full Moon is sometimes open to individual interpretation, especially when it only occurs once a month and because of an illusion a normal moon looks bigger when its lower in the sky and smaller when its higher.
This is sometimes caused by comparing the moon to objects on the ground like trees and building or statues, which may vary size due to their distance from the observer. Basically, the further away an object is, the smaller it looks. So when the moon is low these distant objects it looks much bigger by comparison thus creating a supermoon illusion.
When the Moon is higher up in the sky there are less objects to compare it to, therefore the size difference is only very slight when comparing to previous Full Moons. As you can see, as an educator I have a habit of dispelling misconceptions and providing the most accurate information I can, however this event made me think about encouraging others to explore ideas for themselves. I also thought about how helpful words like "BIGGEST", "BRIGHTEST", "FIRST" "LAST" and "MOST SPECTACULAR EVER" can be, as they seem to be very helpful in getting "likes" to posts, heeheehee.
Picture comparing Perigee Moon (Supermoon) to Apogee Moon (Smallest Moon):
 Video explaining more about the supermoon:

Thursday, May 10, 2012

Recently at SCOB

Its been sometime since we posted any updates on this blog. Since the last post many changes and events have took place. In particular our dear friend and one of the original members of scobbers, SK (ruijie) moved on to other career opportunities. However, several new colleagues have joined the team and allowing scobbers to grow and expand. I have therefore finally got around to continuing what SK started and once again chronicle the events and happenings at SCOB, in addition to our other online updates (facebook, twitter etc.). To begin with let me share some photos of one of our most recent event, the ASPAC Science Centre Conference. Hosting this international event, took considerable planning and preparation. So much so that we closed the observatory for three weeks last month, as many of our scobbers were needed for other duties, in particular facilitating some of the sessions and providing the all important entertainment. The opening ceremony took alot of coordination and practice, mainly due to the number of people involved. This included a spectacular multicultural dance routine.
A musical sound and light show, mostly performed without speaking, which featured many new ideas and demos. Some of which didn't make it in to the final show. It was quite a challenge to incorporate all the different elements. Hopefully we will develop these ideas further to make new shows for visitors.
We also saw a number of other awesome sharing sessions and shows by presenters and educators from overseas science centres.
On one of the last evenings, there was a garden party, which extended from the kinetic garden to the observatory. Apart from opening the telescopes for delegates to view planets and such, many scobbers were busy facilitating the evenings entertainment and decorating the area. Working tirelessly throughout the afternoon blowing and tying balloons inside the observatory classroom.
Overall, the ASPAC conference was a great experience, sharing ideas and our passion for science education with many other from around the world and from far far away.